Blawl
Hello! I have a new design up today. I am sorry it has been so long, I have needed a time of refreshment which I have filled by knitting other people’s designs and I have to say, it has been great. I also joined Nerd Wars, which has been so much fun. Deadlines that don’t mean anything are so much more fun that rigid design deadlines. I am happy to have something to share with you now though.
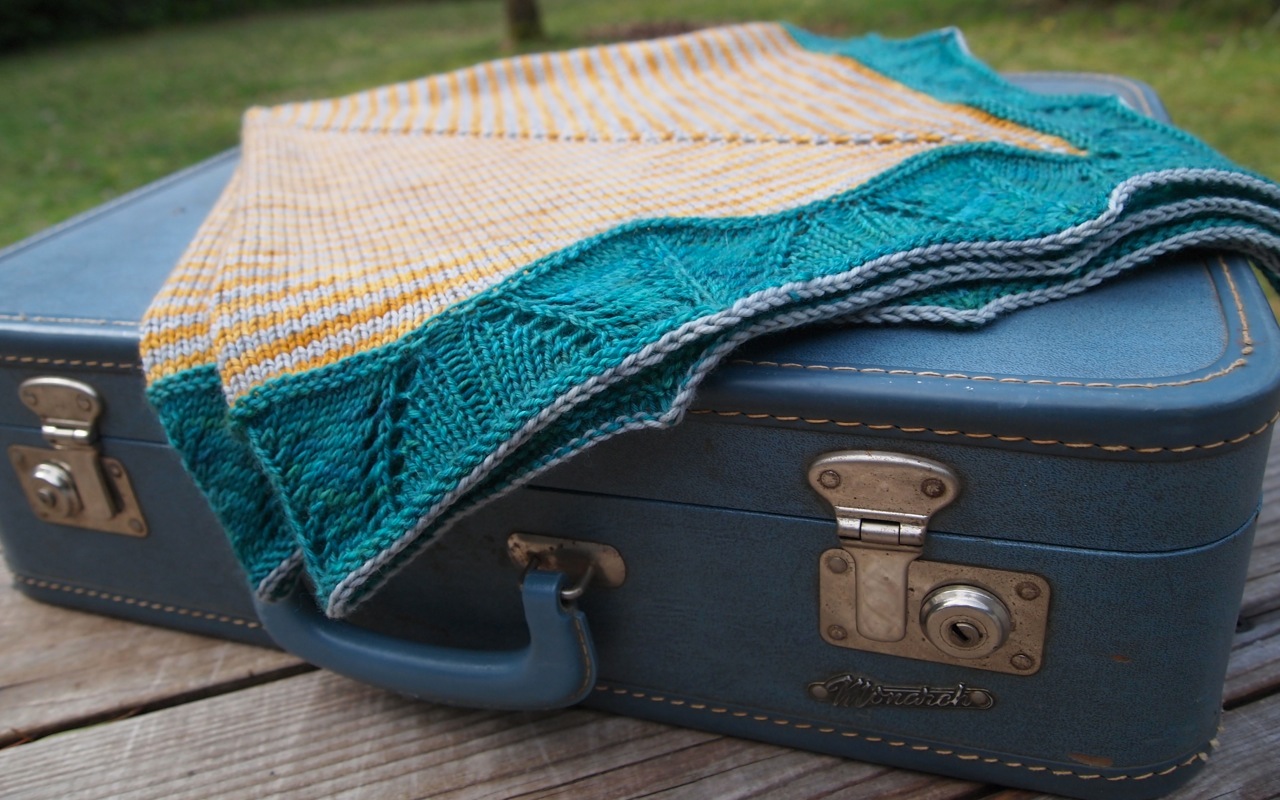
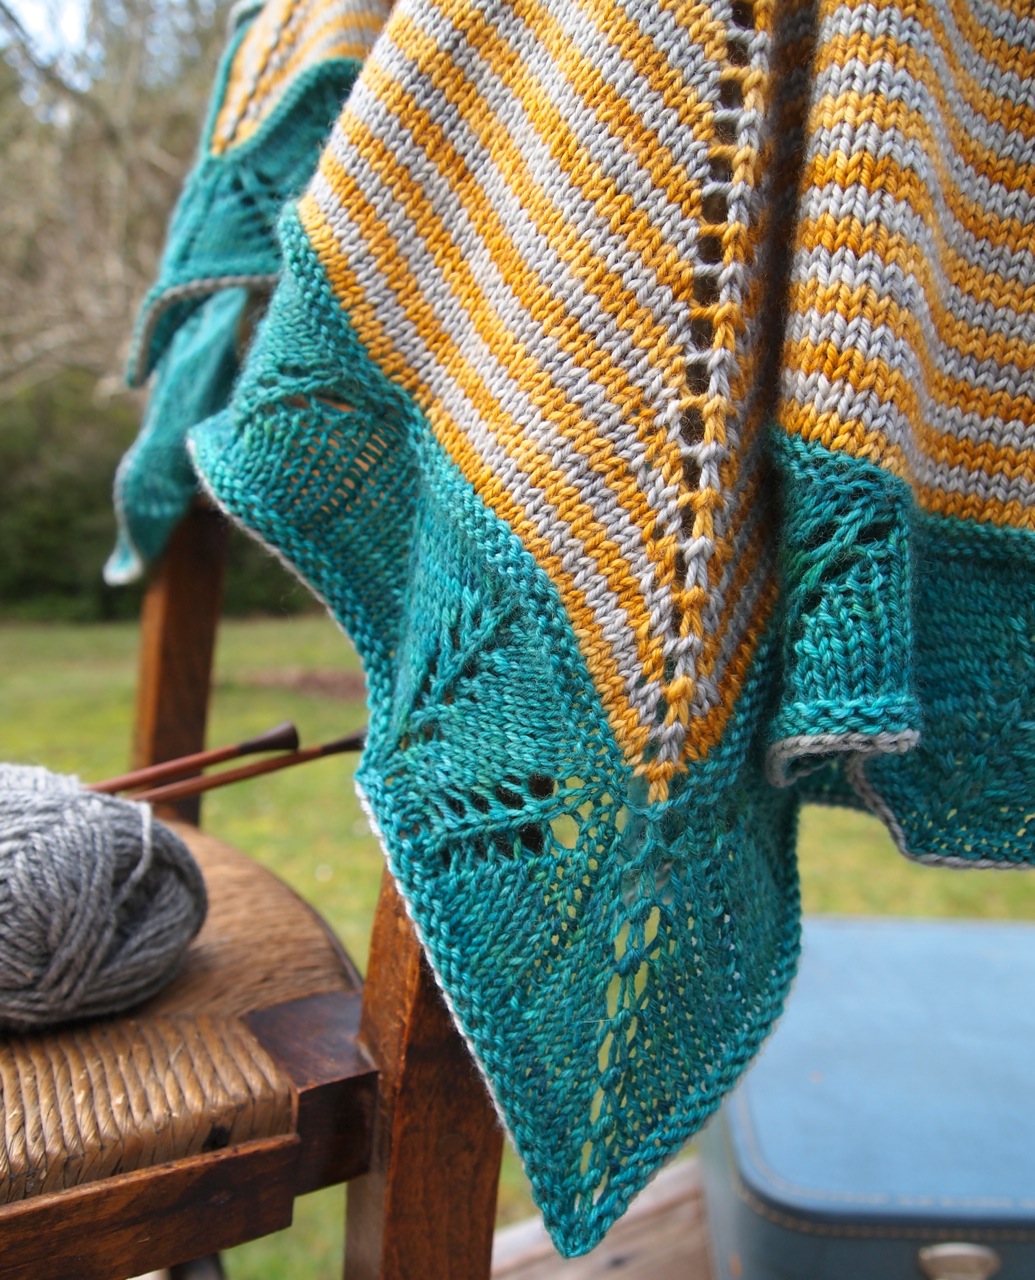
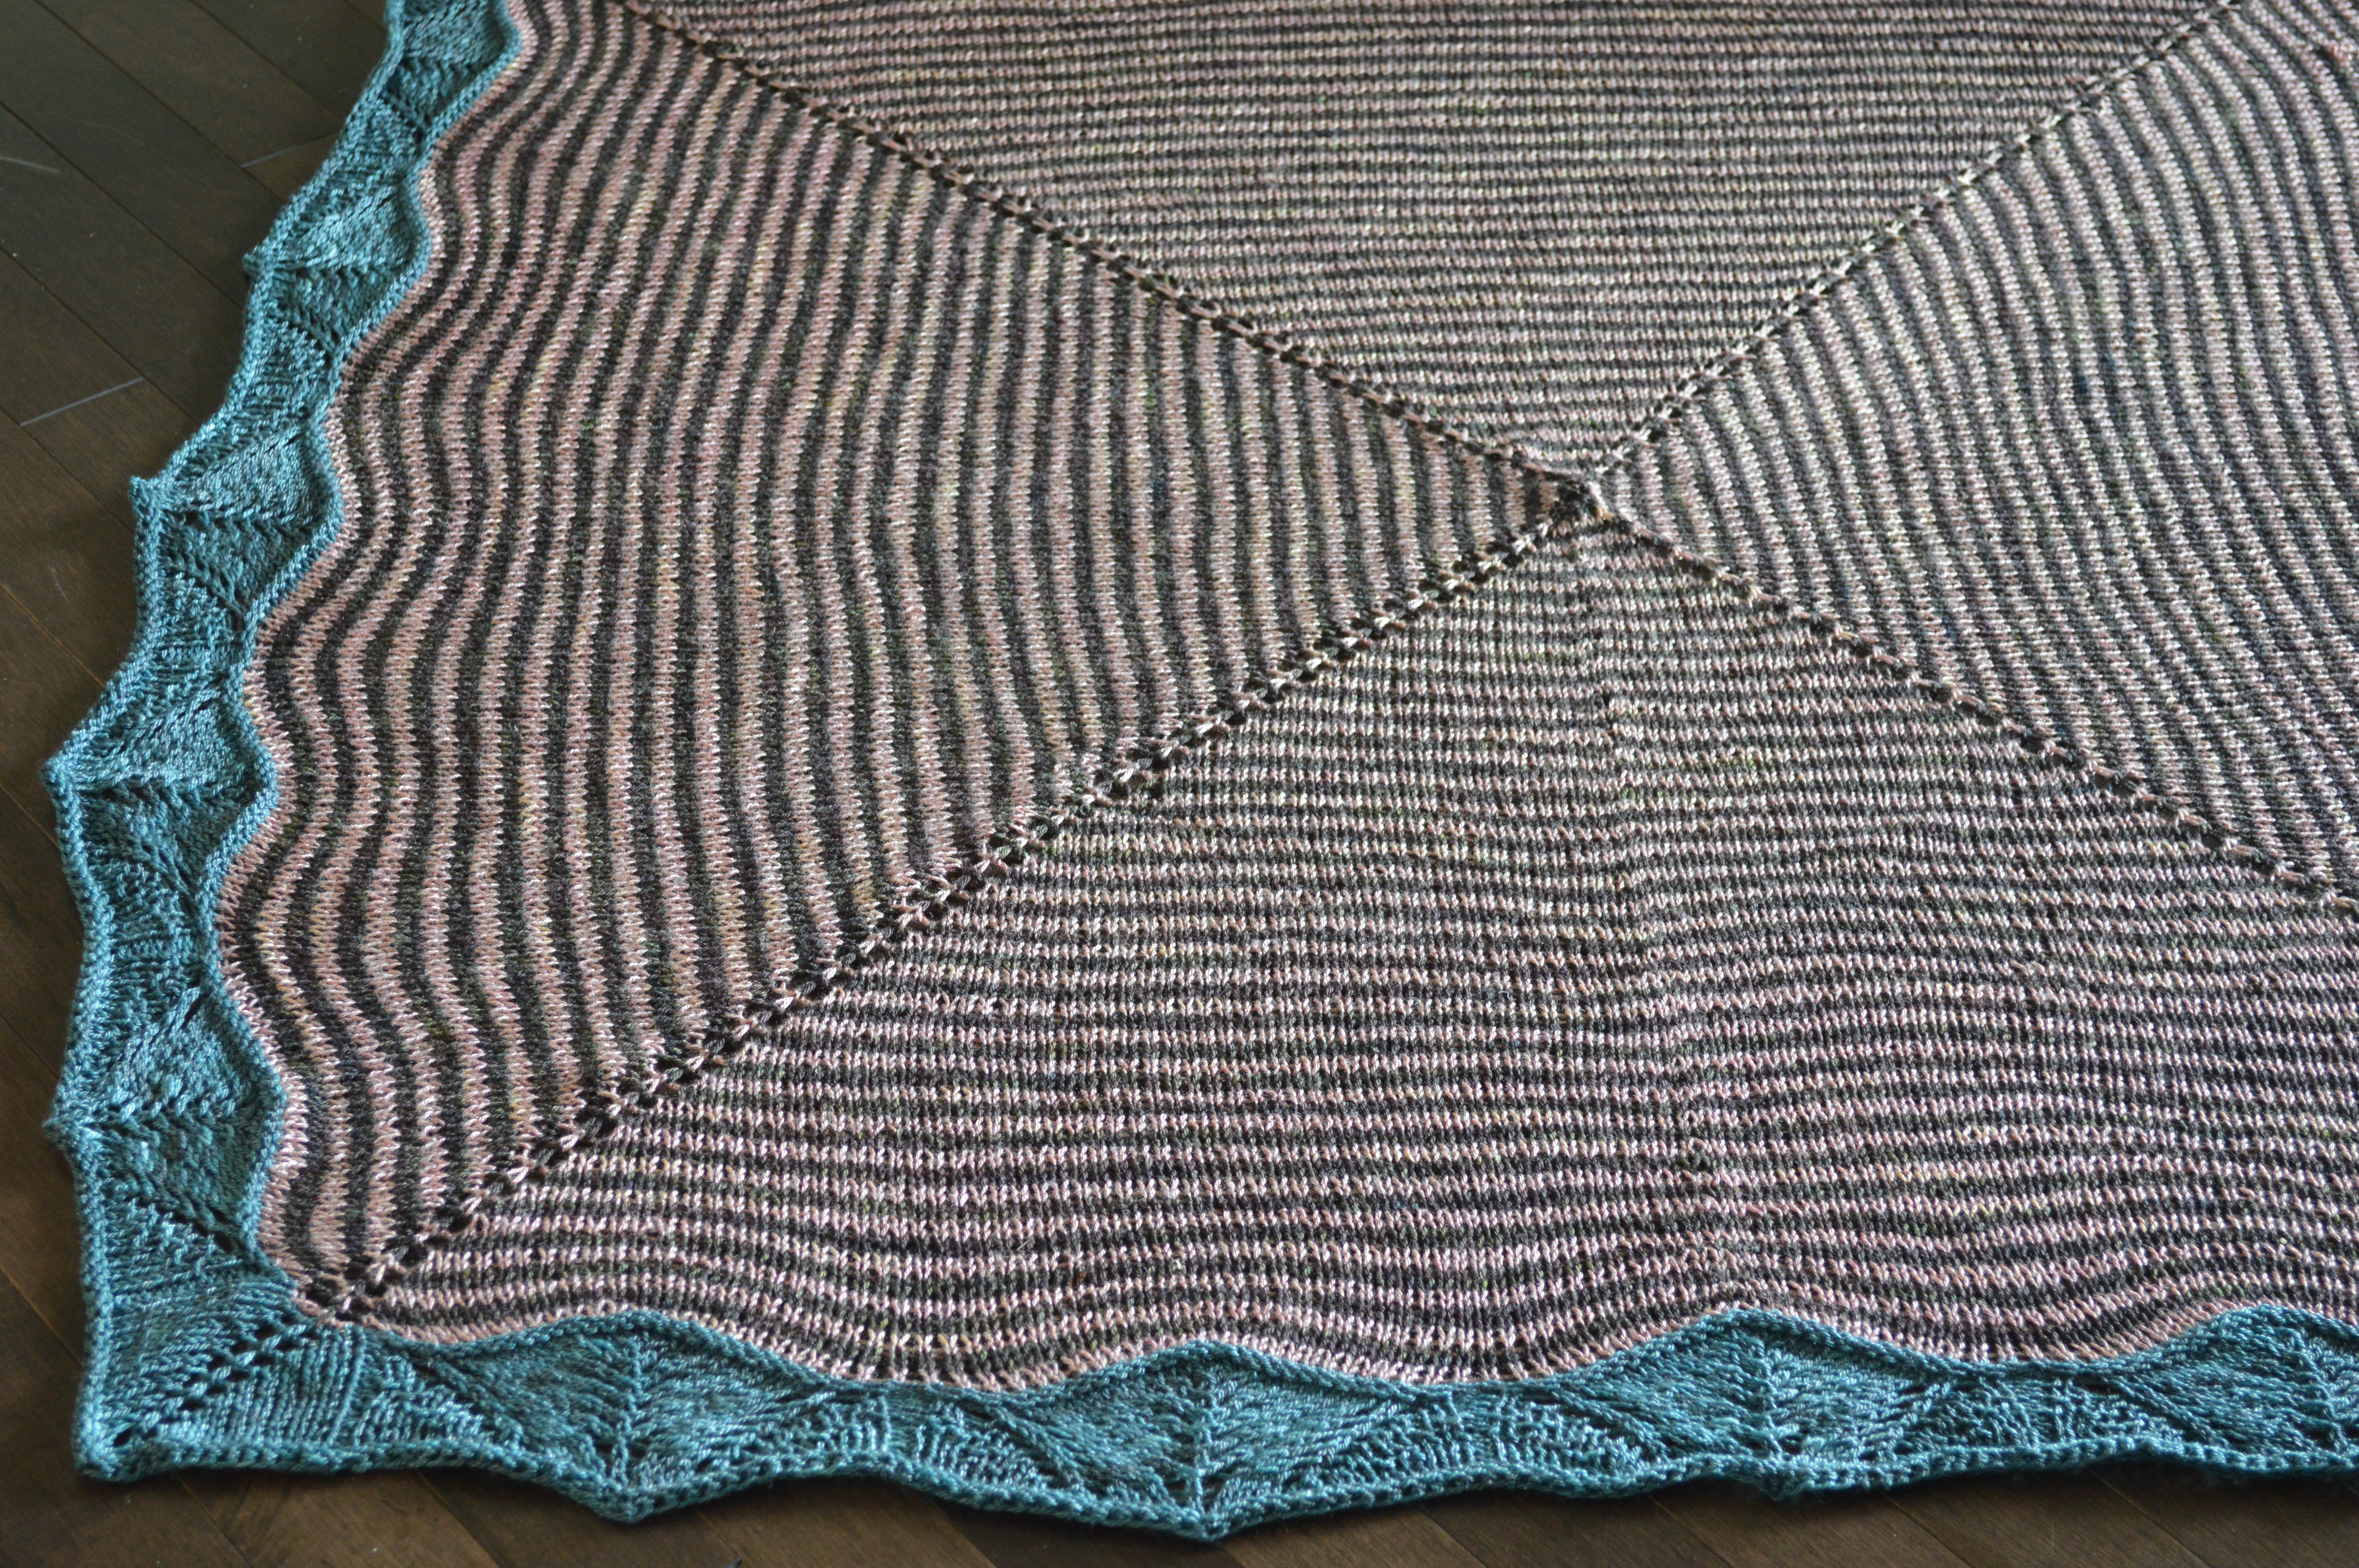
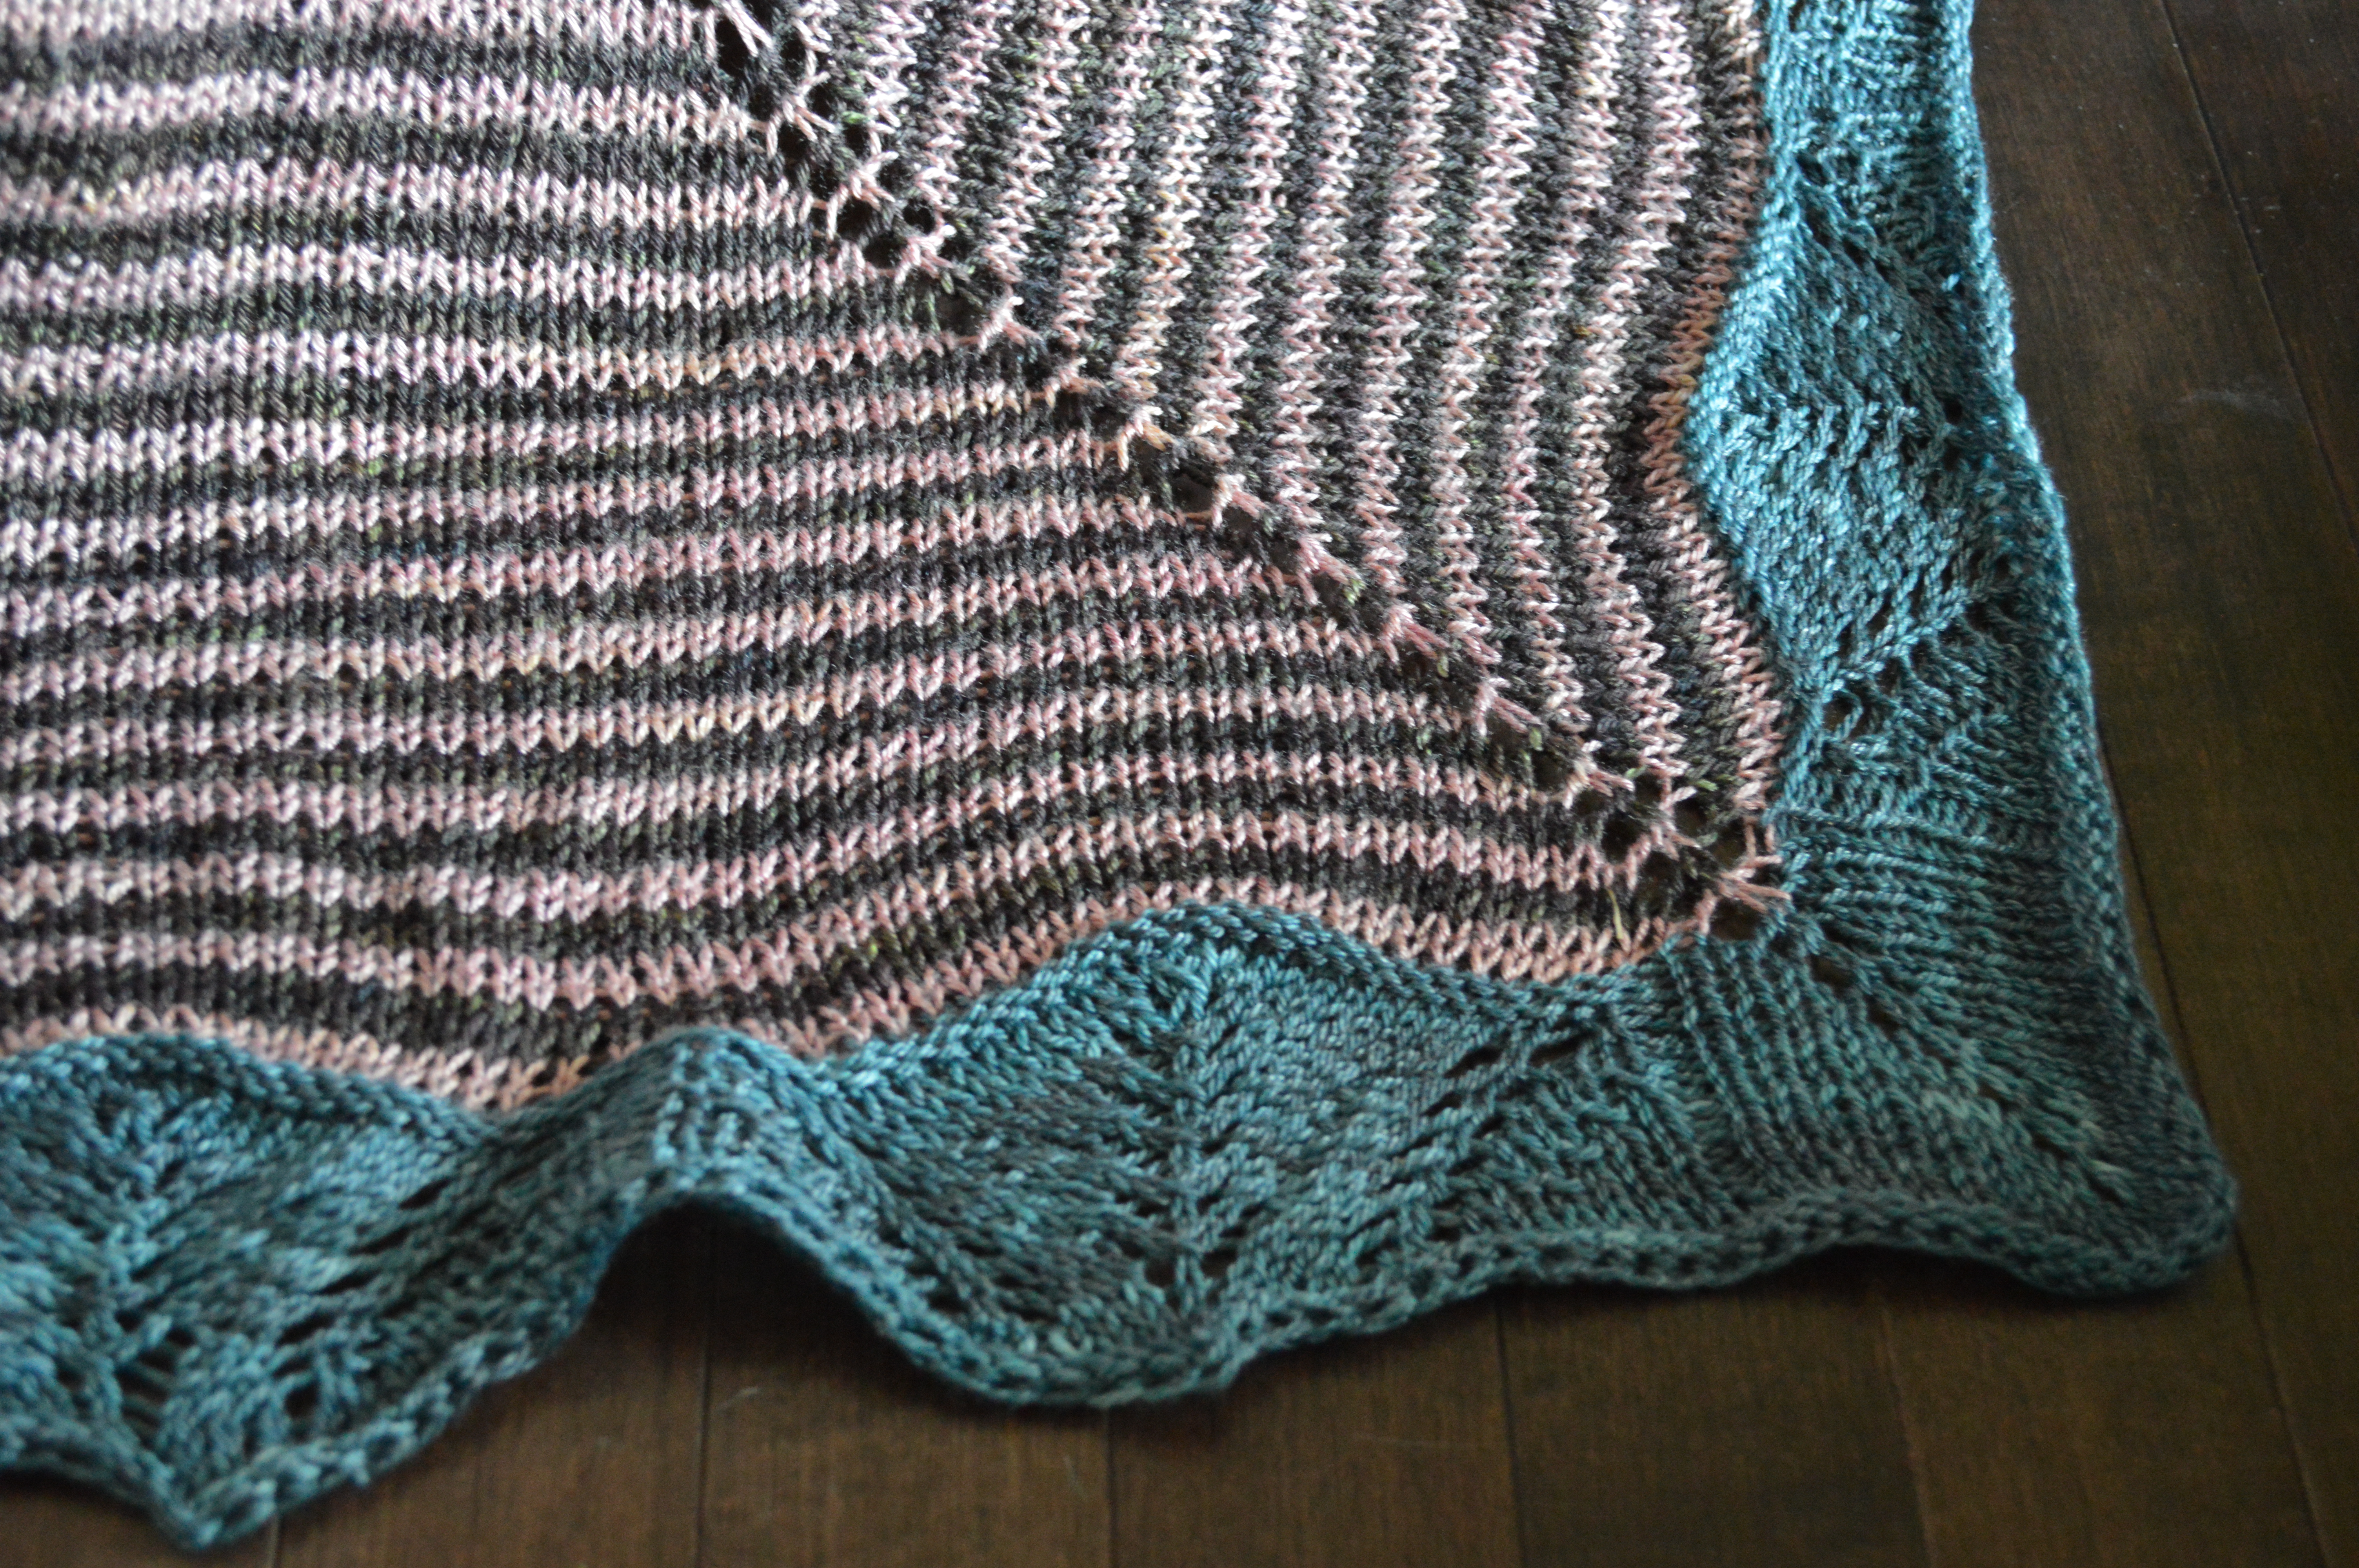
Blawl is a lightweight blanket or shawl which I made in fingering weight yarn, because anyone who knows me (and pays attention to knitting) can tell you that I love to knit circular blankets in fingering weight yarn. I made several lately for baby gifts, which can be seen in my Ravelry projects. Blawl is a square that is worked in 2 row stripes of 2 colourways until that yarn runs out (The pattern has both stitch counts to work to and tips on how to work with the yarn you have so you can use it all up.) and then a third colour is used for the lace border.
Thank you to my honorary cousin Carina for photos and test knitting, and my very good friend Megan for test knitting, and to my friends Chelsea and Val for the early photos that we took before I got my own camera and could take my own.
Trisha
Some unimportant things, or Who cares what sized needles you use?
Good morning! How have you been? Are you knitting today? I have some baby knitting to do, and for once I am excited about it. I started a blanket using Yarn Love’s Elizabeth Bennet a while back, and it has been hibernating, although technically done, because I wasn’t happy with the icord bind off that I used. I blocked it last night and it turns out that I was unhappy for a reason, the BO is way too tight. The fix will have to wait though, as those needles are currently in my new blanket project, the Pi shawl with the lace pattern from the cover of The Knitters Almanac.
We need to have a serious talk though, you and I, so why don’t you do what I have done, grab a steaming cup of tea to go with a toasted everything bagel with cream cheese and smoked salmon, and pull up a chair. This is going to be a tough conversation. I want to tell you something that most knitters seem unable, or unwilling, to accept. It’s important that you know this, though, and I promise that once you accept it, you will be free! Are you ready? Sitting down? Put down your tea, I don’t want you to get burnt when you read this next part. Ok. Here we go.
Needle size doesn’t matter. Not one bit.
We’ve all heard that size doesn’t matter, when it comes to other… pointy sticks. It’s the motion of the ocean, right? Ok. The same is true here. It truly and honestly does not matter what size needles you use, what matters is the effect that you get with the tools. In this case, and walking away from the less appropriate but still hilarious metaphor, the gauge. Gauge matters. Even row gauge matters more than needle size. If you want to exactly replicate the sweater you see in the pattern photo, or the socks that your friend is wearing, you will get closer to that perfect match by 1) using the same yarn, 2) getting the same gauge and 3) being the same size as the model or your friend. If you chose to use the exact needle size because it is the one that the pattern mentions, chances are extremely good that your FO won’t match the one you loved to begin with. Even if, by some amazing change, your stitch gauge matches and stays matched even after blocking, your row gauge won’t be the same. This WILL affect the look of your FO. How do we compensate for that? Most patterns will tell you a length to knit to, not a number of rows, so that it won’t matter if your row gauge is off, you can still match the pattern.
Ah ha, you are saying, but the pattern will also say or size needed to get gauge after it lists the suggested needle size. Yes. Yes it will, and that is exactly my point. Does it say or size needed to get gauge as long as you don’t go up or down by more than 3 needle sizes? Why do so many people have this magic number of 3 needle sizes in their minds? Where did this come from? It’s not true. You can use any sized needle you want, as long as you get a fabric you like, meaning that the gauge is appropriate.
Or size needed to get gauge. Please note the absense of the words if you cannot get gauge with the same sized needle as the designer used, or at least with a needle within 3 sizes of the one the designer used, you are a terrible knitter. Your knitting will be wrong and stupid and terrible and you won’t enjoy it. I have never seen those words in a pattern, have you? There is enough to worry about in life, and in knitting, without adding this to the list. The designer won’t hate you, or refuse to sell you another pattern, if you use the size of needle that you need to get gauge. I promise. Why do people assume that the needle size they need is wrong and that the designer fits some exact knitterly profile where their needle size is the end all and be all? Trust me, that is not true. Look at us at TAAT. Allison and Tesia knit tightly. I have seen Allison’s needles when she is done a pair of socks, all curved around like fish hooks. Tesia can knit socks so tightly with such short stitches that they almost look store bought, but in a good way. Abi and I knit much more loosely, but her stitches are shorter than mine so even if we use the same needles and get the same gauge, which we can do at times, my fabric is looser. So. Is one of us wrong? Or are we all distinct individuals who love to knit and can use whatever needle size we want?
Now, repeat after me. Size doesn’t matter. The needles can be any size at all, as long as I am happy with the fabric that I get, because gauge is important and needle size is not.
Take a deep breath, sip your tea, and think about that for a minute. You will know that it is true. Now get ready to tell it to every other knitter you know, because once you see the truth in this, you will realize how many others do not know it yet. So get out there, spread the word and set knitters free.
Trisha
Newtown Log Cabin Square Pattern
Sometime between yesterday afternoon and this morning, Knitters for Newtown reached its goal of raising $10,000 to support the families and community of Newtown, CT. This seems very fitting to me as the staff, teachers and children of Sandy Hook Elementary school returned to school today. Thanks to the efforts of many volunteers, their new school was cleaned top to bottom, with fresh paint and new furniture added where needed, including raising bathroom floors to make them more accessible to small children. Backpacks, school supplies and personal belongings were moved to the new building to provide the smoothest transition possible for everyone. Grief counseling has been available and outpourings of support have come from around the globe – the new Sandy Hook Elementary School was adorned with snowflakes as students returned to school, and schools around the country participated in a paper crane building project to show their support.
In addition to the sheer hours of time contributed, financial contributions are helping the community begin to move on – but never forget. The United Way of Connecticut website has a list of ways to help, and there is also a Donors Choose website dedicated to providing the teachers of Sandy Hook Elementary School with the supplies and resources they need to rebuild and support their students in every way possible.
These things can’t ever erase the pain felt by the families and community, but they can show our support and reassure everyone that we have not forgotten. In addition to the $10,000+ raised by Knitters for Newtown, Sharon McMahon is also organizing a blanket drive to collect 8″ knitted or crocheted squares which will then be seamed into blankets, at least one for each family – but knowing Sharon, there will be enough blankets to go around for everyone who needs one.
 In addition to donating the proceeds from the sale of my Three Irish Girls patterns, I have also revised and updated my Log Cabin blanket square pattern to meet the blanket drive requirements of an 8″ garter-stitch-bordered knitted square (sorry, crocheters!). The pattern is provided as a downloadable .pdf file below, or it can be downloaded as a .pdf from Ravelry at this link. Use it – share it – knit away – and send your completed squares to Knitters for Newtown by March 31, 2013.
Three Irish Girls
Attn: Knitters for Newtown
PO Box 161165
Duluth, MN 55816
NewtownLogCabin <—download .pdf here!
Newtown Log Cabin Ravelry Page <—view Ravelry page, add to Ravelry library or download .pdf here

There Are No Words

Our school’s flags at half-mast in memory of the 26 lives lost.
There are no words to adequately express the jumble of thoughts, emotions and feelings I have been experiencing since Friday morning. Nothing will bring back the precious children, the talented teachers, or the caring principal and school psychologist who lost their lives on December 14, 2012.
At first, I thought that all I could do was listen to my students as they try to understand what happened. To steer conversations away from speculation and frightening details. To remind them that we are here to protect them, all the while hoping that I don’t ever have to implement the detailed lockdown procedures we were scheduled to practice Monday afternoon.
Then, I learned Sharon at Three Irish Girls has organized Knitters for Newtown, and knew I had been called to do more. In addition to the proceeds from two colorways, Love Wins and The Giving Tree, Sharon is also collecting donations to support Newtown, CT and Sandy Hook Elementary School
To add to her efforts, I am donating my proceeds from any of my patterns published by Three Irish Girls (see end of post for specific details) for the next six weeks, or until the $10,000 goal is met – whichever comes later.
I will make this donation in honor of Rachel Davino, Dawn Hochsprung, Nancy Lanza, Victoria Soto, Anne Marie Murphy, Lauren Rousseau, and Mary Sherlach.
It is in memory of Charlotte Bacon, Daniel Barden, Olivia Engel, Josephine Gay, Ana Marquez-Greene, Dylan Hockley, Madeleine Hsu, Catherine Hubbard, Chase Kowalski, Jesse Lewis, James Mattioli, Grace McDonell, Emilie Parker, Jack Pinto, Noah Posner, Caroline Previdi, Jessica Rekos, Avielle Richman, Benjamin Wheeler, and Allison Wyatt.
This donation will help these families, this community know that they are NOT forgotten. They will know we, the collective-worldwide-knitter WE, support them as their brave children, teachers and staff return to school and as their parents let them go. Let’s help them all move forward, always with a piece missing, without worrying about financial details. It’s one small burden we can ease.
Pattern details (click any picture to go to the pattern page):

Coquihalla Socks – perfectly suited to Adorn, easily adaptable to Kells

Fraggle Hat – works beautifully in Springvale Bulky

Starlit Masquerade socks – use any fingering-weight yarn such as Adorn

Object of My Affection – use any DK/light worsted yarn
In addition, I am offering my free-Ravelry-download Secret Log Cabin blanket square pattern via email to anyone not on Ravelry who would like a copy – just contact me via email. It uses worsted weight or fingering-held-doubled and is very suited to many-knitter blanket projects.
Quick teacher gifts made of yarn, but not knitted
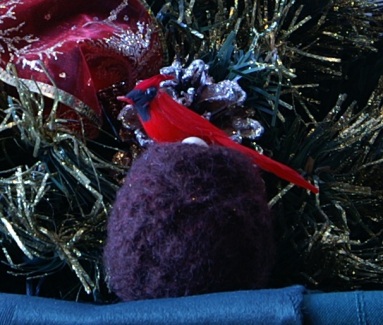
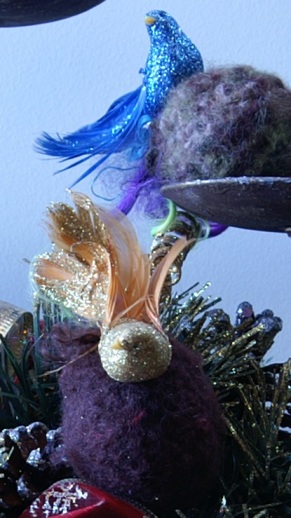
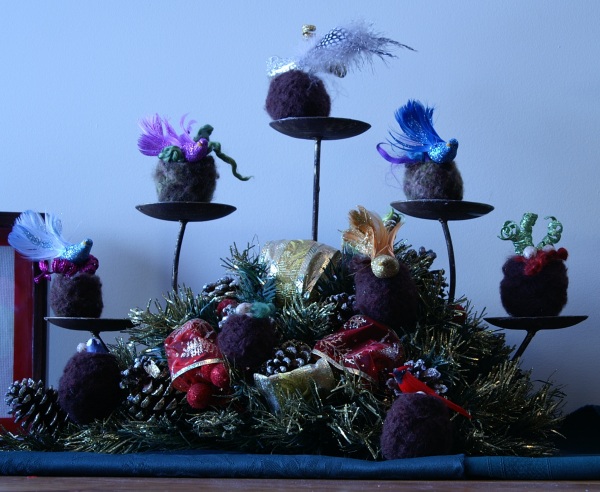
It seems to me that if I were a teacher, I would appreciate every gift that was given to me by my students, but that the ones that would stand out and mean the most would be those made by the students themselves. So this year, my hooligans and I made felted birds nests for the teachers and support staff at their school. Between the two of them, they made a list of 9 teachers and support staff to thank with a gift, and so the budget per gift was pretty small. Stick, my creative and intelligent 6 year old suggested the nests, when we were winding yarn together. We quickly realized just how simple and fun it could be to make them using the ball winder. Here is what we did.
Step one: Purchase some acrylic yarn if you don’t have any in stash. I didn’t, so we got the cheapest worsted weight we could find. We chose bright red, just for fun, but it turned out to be a good idea because it contrasted nicely with the wool colours we chose, and made it easy to tell when we had enough on the ball.
Step 2: Purchase or stash dive for some worsted weight wool, non-superwash. We chose Patons Classic because it’s our standby for fulling (felting). We got a solid brown and a variegated brown and spring green. I had assistance in winding, and my efficient little guy recycled the yarn bands so I don’t know the exact names, but that doesn’t matter. Chose a colour that seems the most like a nest to you.
 Step 3: Wind enough of the acrylic yarn on your ball winder to reach the size you want for the INSIDE of the nest. When the wool fulls, it will pull in on the acrylic, so a make it a little bit bigger than what you want. Cut the yarn.
Step 4: Wind the wool yarn over top of the acrylic until it is the only yarn visible, except perhaps a bit at the top, which is fine. Make sure the wool layer is at least 2cm thick, and no more than 5cm thick, unless you want a large nest and the acrylic section is bigger than an apple. I used the slot at the top of the ball winder to hold the end of the yarn for each layer. Cut the yarn.
Step 5: Wind more acrylic over the wool, using only enough to securely hold the wool in place when it goes in the washing machine. Don’t do a thick layer, it will stick a bit to the wool and make the nest fuzzy. Tie the two ends of this layer together.
Step 6: If you are making a lot of nests, like we did, put them all in one pillow case to full them. Put them in one at a time, making a little pocket of fabric around it by wrapping a thick elastic around the opening to secure.
Step 7: Full the nests in the washing machine. If you don’t know how to do this, there are lots of good tutorials online.
Step 8: Once the nests are out of the washer and are completely dry, remove the acrylic yarn, starting with the outside layer, and decorate the nests with birds, eggs, sparkly twigs and dyed mohair locks, as we did, or using whatever strikes your fancy. The nests can be trimmed down to make a larger opening, like a robins nest, or left round with a small hole like a swallows nest.
Trisha
Stunning Samantha
Hello! Look! It’s me! How have you been? Pretty good? Things have been very good with me. It’s been a great fall and winter so far, baring a few minor catastrophes, and I have been knitting up a storm. I have finally managed to publish a pattern that I have been working on since June, called Stunning Samantha!
Named and knit for my cousin, it will be her Christmas gift unless she disregards my instructions on Facebook to not look at the post about this cowl, in which case she will get NOTHING!!!! (I hope you don’t read this blog, Sam. Hehehe.)
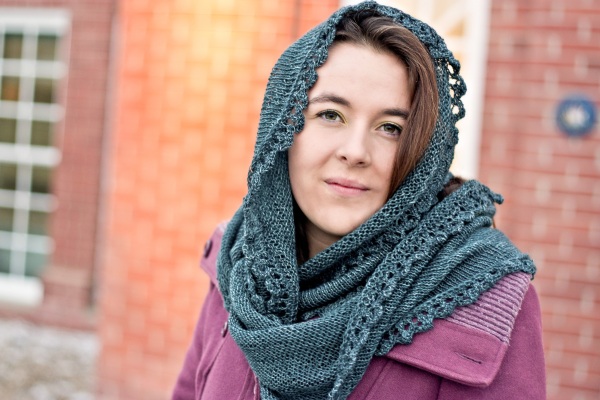
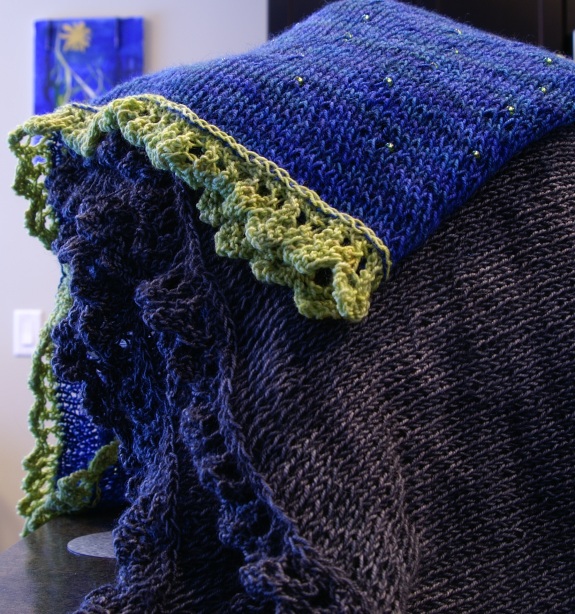
Stunning Samantha is worked all in once piece, beginning with Judy’s Magic cast on, so that the stitches for both the edging and the main body are available at once. The edgings are worked perpendicularly to the body, and bind off all the live stitches so that when you are done knitting, you have only 9 stitches to bind off normally. Beads and contrast coloured edges are optional and there are 2 size options. This pattern takes 2-3 skeins of light fingering yarn, depending on which variations you chose.
The pattern is available on Ravelry to purchase by clicking this link: Stunning Samantha
or on Craftsy by clicking this one: Stunning Samantha
Anna Zilboorg
I have been working really hard on my new collection of patterns. I say collection because I am working on them all at once, but I am going to stagger their release, so please don’t expect an e-book or anything. I have been very excited about the designs, I was very excited about the photo shoot, I am very excited about the photos. I guess between the hard work on these, the hard work on tech editing and on preparing some designs for another publication, not to mention sick kids, snow, and the usual day-to-day stuff like housework and trying to make pea soup when the store has run out of split peas, I got burnt out. Last night I got to the point where I could have cried if someone looked at me funny. Actually, I did. This morning has been no better. I feel discouraged.
But. But I drove my kids to school, and despite their inability to find their mittens or actually wear socks, they were on time. I wore my mittens that I made in a KAL with Abi and our friend Dawn several months ago, for the first time. I didn’t really think about them until I was driving home, and I realized how warm and comfy my hands were. I realized that I had made those mittens with friends who support me, out of yarn dyed by one friend and spun by another. I thought of Anna Zilboorg, who designed the mittens. Abi and I took a class with her at each of the Sock Summit’s, and I have to tell you, she is incredible. You can tell by listening to her that she loves life, that she delights in a challenge, because defeating those challenges stretches her and makes her grow and she likes that. She doesn’t hide behind discouragement to simply do her best. She does better.
Today I will be Anna Zilboorg. Watch for some fascinating stories and real joie to vivre coming from me today.
Knitting in a Zipper

Once upon a time, I made a sweater. It was very pretty and soft and cozy (and it was actually finished, it’s just that I don’t seem to have a photograph of it finished). I liked it very much. It combined some of my favorite colors and one of my favorite yarns and it was meant to be a cozy layering sweater.
I knit it with corrugated ribbing at the hem and cuffs, and applied i-cord along the edges. I had originally planned on getting nice pewter buttons and putting some i-cord buttonhole loops on one of the sides. However, I couldn’t find buttons I really liked so I decided to just use regular applied i-cord and put in a zipper.
In the end, though, it turns out that I was far too intimidated at the thought of sewing a zipper into my sweater. Nevermind the fact that I had already sewn lines down my sweater and CUT IT APART, sewing a zipper in was just too much to think about. What if the sewing machine ate my sweater???
After leaving the sweater to sit in my almost-finished basket for far too many months, I decided it was getting a bit ridiculous. I gave the sweater to my mom in exchange for her putting buttons, snaps or a zipper in if she wanted one. (In retrospect this was probably a good thing, because these colors are more “her” than “me”.)
Now, several years later, TECHKnitter just came out with a fantastic tutorial including instructions for how to KNIT a zipper into your finished sweater. Click here, read the tutorial, and get knitting (with zipper)!
~Abigail
Sale!
Yesterday it snowed. Some friends got stuck along hwy 40, they couldn’t make it up a hill no matter what they tried, so they had to turn back and spend the night in Grande Cache. This is not what I like to hear. So, to distract myself, I am having a sale. Buy 2 patterns, get one free. The sale applies to all my self published patterns. If you and 2 friends want to get 3 copies of my ebook, Grande Prairie hats, for $40 rather than $60, send me a pm on Ravelry, I will hook you up.

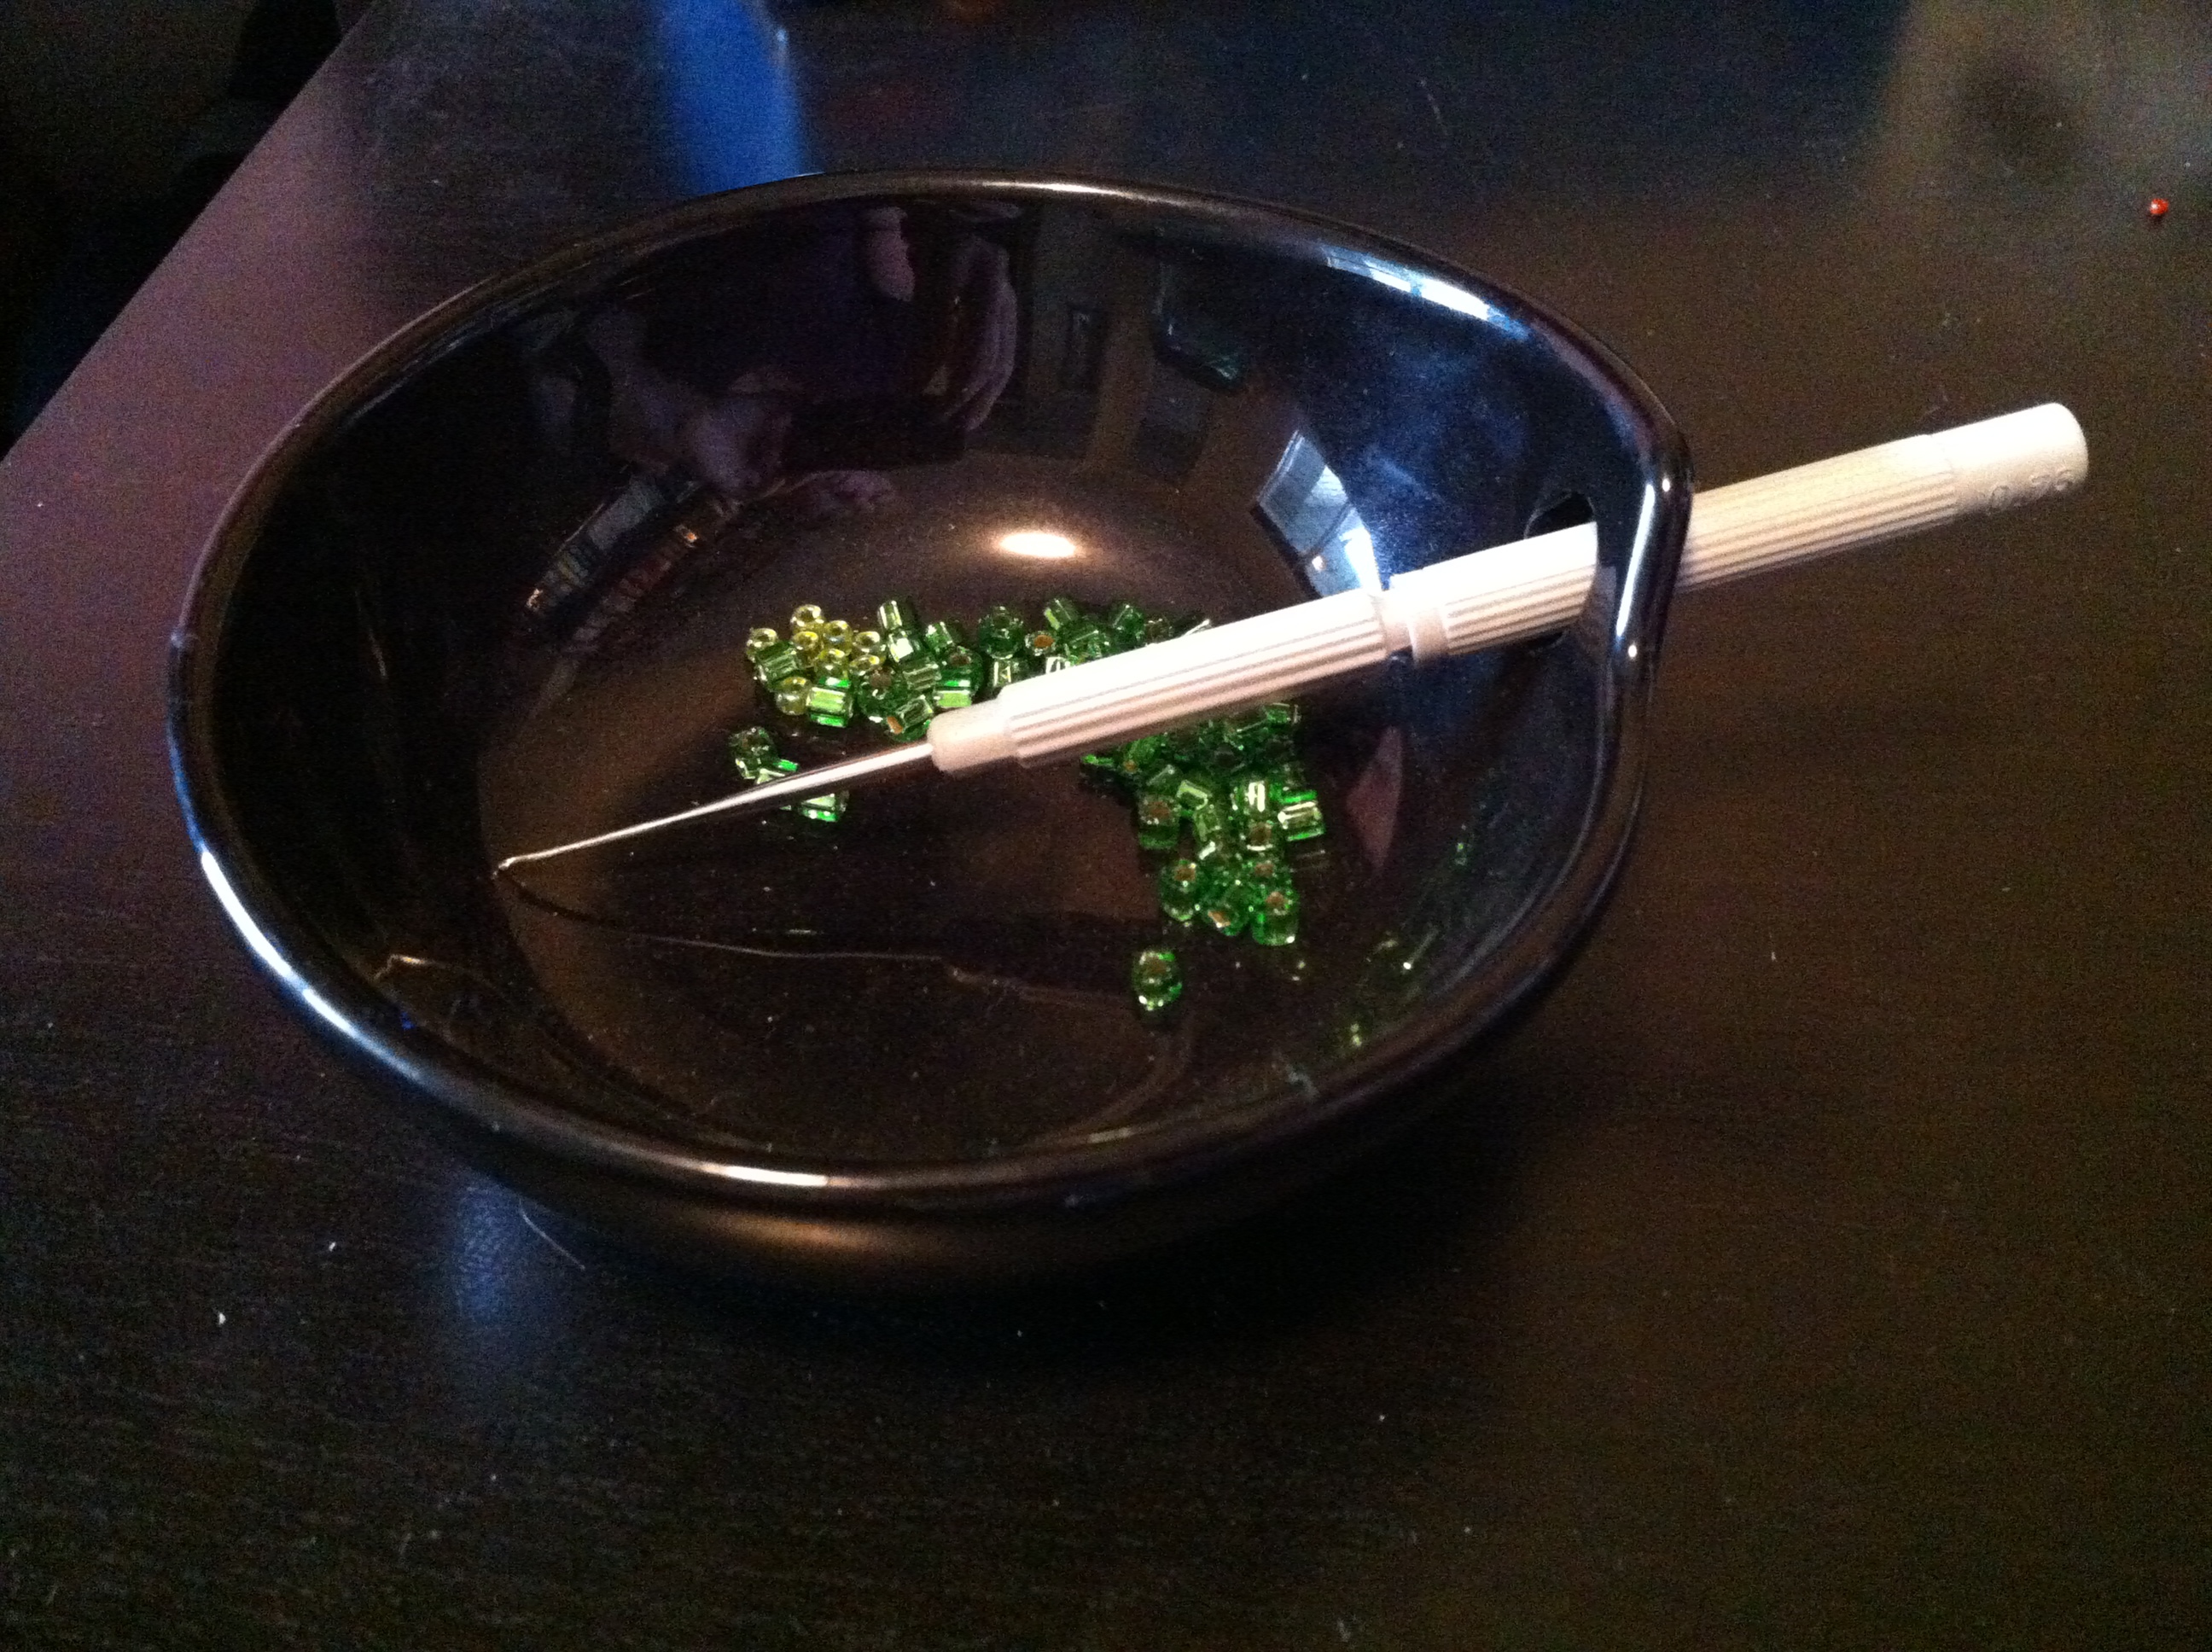
A useful tip
I have been working on a few new designs lately, 2 of which have the option to include beads. I set up a handy little beading station, and thought I should share it with you all.
Here is a sushi rice bowl, the kind with the hole for the chop sticks, and my tiny Addi crochet hook. See how nicely and conveniently it fits? I will be using this set up for beading from now on. The hook just sits in place, and doesn’t fall out of the bowl, or roll away on the table, or fall between my leg and the chair. Whenever it was time to place a bead, I just grabbed the hook, jabbed a bead and slipped it onto the stitch, then slid the hook back into the bowl. It really sped things up for me.