Quick teacher gifts made of yarn, but not knitted
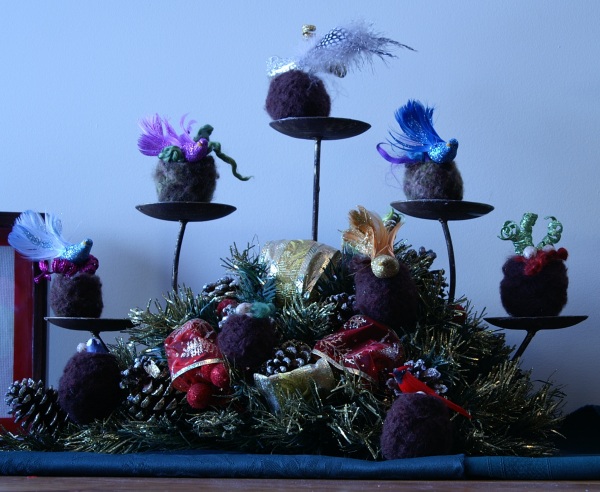
It seems to me that if I were a teacher, I would appreciate every gift that was given to me by my students, but that the ones that would stand out and mean the most would be those made by the students themselves. So this year, my hooligans and I made felted birds nests for the teachers and support staff at their school. Between the two of them, they made a list of 9 teachers and support staff to thank with a gift, and so the budget per gift was pretty small. Stick, my creative and intelligent 6 year old suggested the nests, when we were winding yarn together. We quickly realized just how simple and fun it could be to make them using the ball winder. Here is what we did.
Step one: Purchase some acrylic yarn if you don’t have any in stash. I didn’t, so we got the cheapest worsted weight we could find. We chose bright red, just for fun, but it turned out to be a good idea because it contrasted nicely with the wool colours we chose, and made it easy to tell when we had enough on the ball.
Step 2: Purchase or stash dive for some worsted weight wool, non-superwash. We chose Patons Classic because it’s our standby for fulling (felting). We got a solid brown and a variegated brown and spring green. I had assistance in winding, and my efficient little guy recycled the yarn bands so I don’t know the exact names, but that doesn’t matter. Chose a colour that seems the most like a nest to you.
 Step 3: Wind enough of the acrylic yarn on your ball winder to reach the size you want for the INSIDE of the nest. When the wool fulls, it will pull in on the acrylic, so a make it a little bit bigger than what you want. Cut the yarn.
Step 4: Wind the wool yarn over top of the acrylic until it is the only yarn visible, except perhaps a bit at the top, which is fine. Make sure the wool layer is at least 2cm thick, and no more than 5cm thick, unless you want a large nest and the acrylic section is bigger than an apple. I used the slot at the top of the ball winder to hold the end of the yarn for each layer. Cut the yarn.
Step 5: Wind more acrylic over the wool, using only enough to securely hold the wool in place when it goes in the washing machine. Don’t do a thick layer, it will stick a bit to the wool and make the nest fuzzy. Tie the two ends of this layer together.
Step 6: If you are making a lot of nests, like we did, put them all in one pillow case to full them. Put them in one at a time, making a little pocket of fabric around it by wrapping a thick elastic around the opening to secure.
Step 7: Full the nests in the washing machine. If you don’t know how to do this, there are lots of good tutorials online.
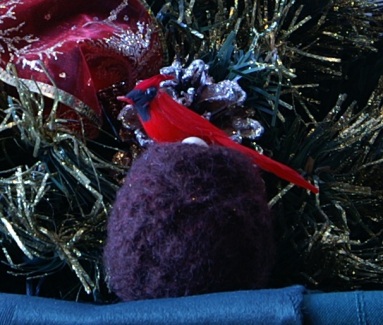
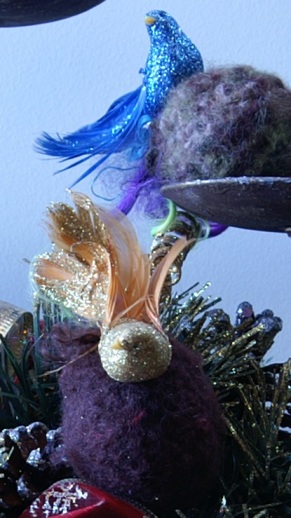
Step 8: Once the nests are out of the washer and are completely dry, remove the acrylic yarn, starting with the outside layer, and decorate the nests with birds, eggs, sparkly twigs and dyed mohair locks, as we did, or using whatever strikes your fancy. The nests can be trimmed down to make a larger opening, like a robins nest, or left round with a small hole like a swallows nest.
Trisha